Alice and the Language Server Protocol
The Language Server Protocol (LSP) allows editors to communicate with language servers to implement features such as code completion and navigation. The de facto standard LSP server for OCaml is OCaml-LSP (aka. ocamllsp and ocaml-lsp-server). This page is a guide for using OCaml-LSP while editing OCaml code in Alice projects.
Note that to use OCaml-LSP in an Alice project you’ll need to be using Alice v0.3.0 or later.
Table of Contents
- Terminology
- Install OCaml-LSP and dot-merlin-reader
- Confirm that the tools are installed correctly
- Configure your Editor
- Formatting your code with OCamlFormat
Terminology
An editor is a program like Visual Studio Code, Neovim or Emacs that you use to edit code. An LSP Client is part of an editor, either built into the editor directly or installed as a plugin, and implements IDE features such as displaying documentation when hovering over a term or navigating a codebase, without knowledge of any specific language syntax or semantics. An LSP Server is a program that runs in the background and analyzes code in a particular language, responding to queries made by the LSP Client such as “What’s the type of this expression?” or “Where is this function defined?”. LSP Clients are usually responsible for launching the appropriate LSP Server when an editor first starts editing code in a particular language.
There’s often a way to configure your editor to run a particular command to
start the LSP Server for a given language, or at least to customize the
arguments passed to the LSP Server on launch. This is important because the
default configuration for OCaml-LSP only works for Dune
projects, and an extra argument (--fallback-read-dot-merlin) needs to be passed to the OCaml LSP Server in
order to use it for Alice projects. More on this
below.
Install OCaml-LSP and dot-merlin-reader
In addition to the OCaml LSP Server you’ll need a tool called
dot-merlin-reader which will allow OCaml-LSP to parse a .merlin file which
Alice will create and maintain at the root of your project. As explained above, OCaml-LSP only
works for Dune projects in its default configuration, and non-Dune projects
need to place a .merlin file at their root so OCaml-LSP can identify the
project’s boundary within the file system.
Don’t check this file into version control, as some paths might not be portable between different computers.
Merlin is the OCaml editor service used
internally by OCaml-LSP, hence the name .merlin.
Read more about the .merlin file here.
You’ll need to install the executables ocamllsp
(from the OCaml-LSP project) and dot-merlin-reader. There are several ways to
go about this. The main consideration is that the ocamllsp executable that your
LSP Client launches needs to have been compiled with the same compiler that Alice
will run when building your project (which is also the one that runs when you type
ocamlopt.opt in your terminal - Alice respects your PATH variable!). As long as you get OCaml-LSP and the OCaml
compiler from the same place then everything should work.
Here are some options for installing the necessary tools:
Option 1: Use Alice
On Windows, macOS and Linux, Alice can install pre-compiled development tools with the following command:
This includes ocamllsp, dot-merlin-reader, and the OCaml compiler that was
used to compile them both. The install location differs between OSes:
- On Unix-like systems they are installed to
$HOME/.local/share/alice/current/bin(but the$HOME/.local/shareprefix can be overriden by the value of theXDG_DATA_HOMEenvironment variable). - On Windows they are installed to
%USERPROFILE%\AppData\Local\alice\current\bin.
Make sure that the directory appropriate to your system is in your PATH
variable and appears earlier than any other directory that might contain OCaml
tools (e.g. the bin directory from an opam switch).
Option 2: Use Opam
Install all the necessary tools to the current opam switch by running:
Since opam will build these packages from source using the OCaml compiler from your current switch, you’ll end up with an LSP Server that’s compatible with your compiler.
Option 3: Use Nix
Users of the Nix package manager can install the ocaml,
ocamlPackages.ocaml-lsp, and ocamlPackages.dot-merlin-reader packages from
the nixpkgs repo. Alternatively, install the github:alicecaml/alice flake
which contains all 3 packages as well as Alice and ocamlformat, or
github:alicecaml/alice#tools which is the same but lacks Alice itself.
Confirm that the tools are installed correctly
First verify that you have all the requisite tools by running:
$ which ocamlopt.opt
$ which ocamllsp
$ which dot-merlin-config
…on Unix-like systems, or:
> Get-Command ocamlopt.opt
> Get-Command ocamllsp
> Get-Command dot-merlin-config
…on Windows (in PowerShell).
Configure your Editor
You need to make it so that when your editor or LSP Client launches the
ocamllsp executable, that it passes the argument --fallback-read-dot-merlin.
That is, it runs the command:
The specific configuration depends on your editor:
Visual Studio Code
Use the OCaml
Platform
plugin, which will automatically launch ocamllsp when you start editing an
OCaml project. On the settings page for the OCaml Platform plugin, find the
section labeled “Ocaml > Server: Args”, with description “Extra arguments to
pass to ocamllsp.”

Click “Edit in settings.json”, and add the following:
Visual Studio Code also needs to be told how to launch ocamllsp and other tools.
The OCaml Platform plugin has a concept of a “Sandbox” which is a collection of OCaml tools,
and every project must be configured with a particular sandbox in order for the OCaml Platform plugin
to provide editor support. To select the sandbox for a project, select the OCaml Platform plugin on the left side of the VSCode window
and click on “Select a Sandbox” under “COMMANDS”:
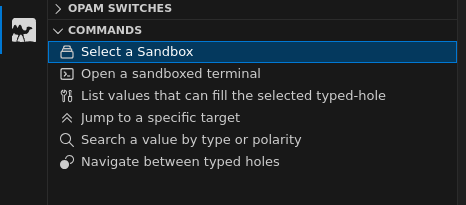
That will display the following drop-down menu:

The appropriate sandbox for Alice projects depends on how you installed the OCaml LSP Server and other development tools.
If you installed tools with Opam then select the sandbox which corresponds to the Opam Switch in which the tools were installed.
If you installed tools with Alice (by running alice tools install) then select “Custom”. You’ll be prompted to enter a command template with
placeholder values for the program and its arguments ($prog and $args
respectively):

Fill in the template with a command that launches the appropriate instance of each tool. For example when the OCaml Platform plugin wants
to launch the OCaml LSP Server it will run this command with $prog
substituted with ocamllsp and $args substituted with
--fallback-read-dot-merlin. If you installed tools with the alice tools install command
then a suitable template for Unix-like systems is:
On Windows a suitable template is:
Note that on Windows the template must use CMD.EXE syntax rather than PowerShell.
The example above for Windows assumes you use mingw64 as your C compiler,
installed with msys2 with its default install location. You’ll need to change this to
match your setup.
Read more about OCaml Platform sandboxes here.
Neovim
Using the nvim-lspconfig plugin,
enable running the ocamllsp server and configure its startup command with:
Make sure your PATH variable is set correctly such that the instances of the
OCaml tools you installed above are launched by Neovim.
On Unix-like systems it’s recommended to use direnv to manage project-specific environment variables.
If you installed tools with alice tools install then your project’s .envrc file should be:
If you installed tools with Opam, use:
…replacing SWITCH with the name of the switch which you installed the tools into.
Emacs
Use the lsp-mode package which contains an LSP client for Emacs.
You’ll need to make sure that Emacs can find the ocamllsp executable. One approach is to use direnv
and to create a .envrc file as described above in the Neovim configuration, and then use the envrc
package to have Emacs pick up the changes to the PATH variable.
If you installed tools with alice tools install then your
.envrc file will run alice to find out the location where tools were installed.
You’ll need to add the directory containing the alice executable (~/.local/bin) to both the 'exec-path list and the PATH environment variable
(even if you’ve already added ~/.local/bin to PATH in your shell config file, in case Emacs is launched from an icon rather than the terminal).
Finally, you’ll need to override the lsp-ocaml-lsp-server-command variable to pass --fallback-read-dot-merlin to ocamllsp.
Here’s a snippet of an Emacs config file (~/.emacs or ~/.emacs.d/init.el) that applies the above configuration.
Not shown here is how to install the lsp-mode and envrc packages.
These packages are in the MELPA repository.
There are
several ways to install MELPA packages in Emacs.
Here’s a guide for getting started.
Formatting your code with OCamlFormat
If you have ocamlformat and ocamlformat-rpc installed, OCaml-LSP can use
them to format your code from your editor (e.g. in Visual Studio Code,
right-click inside the editing window and select “Format Document”). These tools are installed
when you run alice tools install, and can alternatively be installed with opam
by installing the ocamlformat package. By default auto-formatting is disabled for
new projects, but a project can enable auto-formatting by creating an empty file named
.ocamlformat at their root (i.e. next to Alice.kdl). Check this file into
version control so all collaborators on a project share the same code style.
Read more about OCamlFormat in its
manual.